3D Printed Animatronic Tail with Arduino, Accelerometer and Servo Motors
Today's project is one that will certainly be of interest to cosplayers or anyone who has ever taken their Halloween outfits extremely seriously. With the help of an Arduino accelerometer module, we'll be creating a working animatronic tail that can help bring your fantasy outfits to life like never before. With this new wearable Arduino gadget, which is also one of the first we've put together here, your new Velociraptor costume will never be the same again.

Putting it together
This project is definitely meant for advanced users since the construction, assembly, and coding required to get the tail working as desired is moderately complex. You'll also need access to at least a basic 3d printer to get all the parts you will need in order to put this project together.
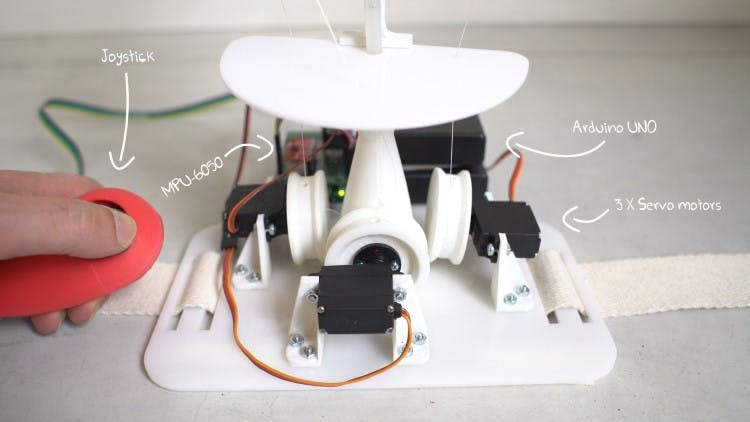
The tail's movement is primarily driven by a trio of servo motors attached to the tail and controlled by a gyro stabilized accelerometer to determine the tail's movement when you walk around or move from side to side. Our build also features a remote control system attached to a handheld joystick to allow you to directly manipulate the tail's motion when you want to control it manually.
You can check out a detailed view of all the electronic parts you will need as well as getting all the code you need to get it working by clicking this link.

Customize it
While the tail we've created could probably be a great part of a good 'Xenomorph' costume with a bit of black paint, there are naturally a lot of different ideas you could implement to change the basic design we came up with and adapt it to your needs. You could change the length as well as the number of joints in the tail, which would give you greater control and be able to perform a more natural and far more complicated tail movement.
You could also create covers for your tail, either made out of printed cloth or textured surfaces to simulate different types of skin or fur. you could even 3d print segmented sections to cover your tail giving it a stronger and more defined form while still allowing it to move; similar to how a reptile's scales behave. Do keep in mind however that when you add weight, you may need to add stronger servos as well as additional or more powerful batteries to power them. So make sure you keep your energy requirements and plan your weight distribution well ahead of time. Ideally what you want is for your tail's center of gravity to lie as close to the fastening straps around your waist so that it doesn't shift your sense of balance.
While our tail relies on either the Arduino controlled accelerometer or manual joystick control to operate the servo motors, you could develop your own control methods that better suit your needs, such as programming in your own specified movement patterns and using a controller to cycle between them. You could even try installing proximity sensors in order to have your newest appendage react autonomously when someone tries to touch it even when you're standing still.
Alternative Applications
While we put together this gyroscopically stabilized Arduino accelerometer as a tail intended for a stage show, there are plenty of other creations you could build using technology from this build. Beyond simply adding four remote-controlled robotic arms similar to Spiderman villain and scientist Dr. Otto Octavius (although that would undoubtedly be quite awesome); you could also work on creating your own robotic and animatronics creations that use the gyroscopic accelerometer along with a motor control system to maintain stability, heading and speed while operating.
With a gyroscope, an Arduino accelerometer and a few servo motors in hand you have everything you need to create cool little spider bot. What you create and what form your new robot minions will take is entirely up to you :)
Of course accelerometers and servo motors have plenty of applications that go well beyond just the fields of animatronics and robotics such as aeronautics, with both often being employed in building advanced model aircraft.
What will you create?
Whether you're dressing up for a convention, a party or putting on a stage show, with this wearable remote controlled tail, you're well on your way to creating some truly epic custom made outfits and costumes.
Let us know what you thought of this Arduino build. Did you try it out for yourself or on your friends? Did you make any cool changes to our basic design with some interesting modifications, or maybe even created your own unique animatronics or robotics project using the same motor setup we demonstrated here? We'd love to hear about what you created. Why not share some images or videos of your work with the rest of the community in the comments.

